Showing posts with label entry. Show all posts

Monday, September 26, 2016

Exciting News - BH&G Feature!!!


It's been pretty exciting around our house lately! I'm still on cloud nine and
  truly couldn't be more grateful for the opportunity to have our little old house we
love featured in BH&G!  

Do you guys remember when I shared the details of the photo shoot two years ago, and
then BH&G's Refresh Magazine Spring 2015 feature of the exterior of our home and yard.
 And, also mentioned our interior would be in the Refresh Fall 2015 issue.
The dates, as well as which magazine our interior would be featured changed a few
 times over the past couple years, and I'm still bowled over that it ended up in the
October issue of Better Homes & Gardens!!
  
I'm happy to be able to share some of the photos with you, as not all the homes
 they feature are published in all areas, and ours happened to fall in that category.      


 As you know, if you're a regular reader, furniture gets rearranged,
walls repainted, and color schemes refreshed...often. It's fun to look back
and see how it's changed.


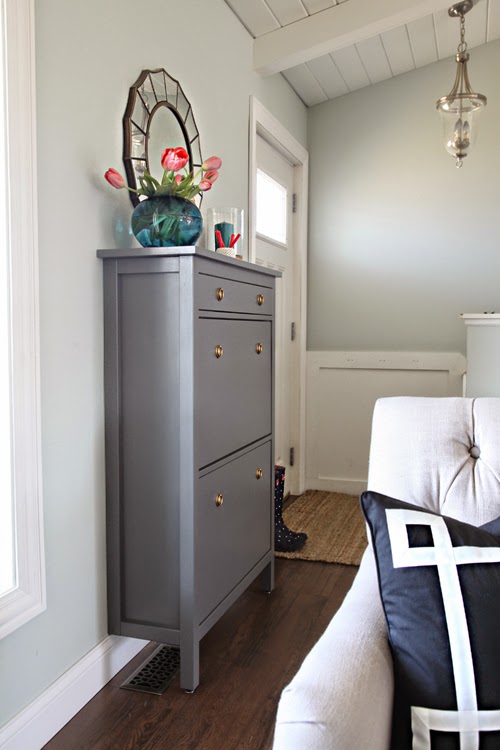
Wow, the entry is still the same!


My favorite thrifted chairs, after their makeovers, are still in my living room today.
(I'm not as bad as I thought!)


This hutch has had nine lives, and was one of my favorite makeovers. It's now
white and in my dining room.


My mostly neutral dining room, except for the addition of my bold buffet, and a peek at
 the nailhead ceiling.
This set of chairs is going on Craigslist any day, if you're local and interested let me know.


This free dresser I rescued from the street was the first time I was brave with a
bold paint color. I was so scared, ha!  


Hmmm...looking at this makes me wonder how my island would look if it were white?


My bedroom hasn't changed a bit, but I'm getting the itch.

BH&G did a great article that was a fun surprise when it popped up on my
Pinterest feed! :)
"The Cottage Makeover is All in the Details"
 with lots of before and after photos and links to the DIY tutorials,
 you can find it HERE.  

It starts with a diamond in the rough photo when we first purchased our home!


Thank you all so much for always stopping by, and for your endless enthusiasm and
encouragement for all my projects and decor!

xoxo,
Pam


Sunday, June 28, 2015

diy stenciled ikea rug


I'm sure you've forgotten about the Ikea Osted rug I mentioned I was 
planning to stencil two and a half months ago! It was to replace the suzani rug that I'd
 stenciled for our entry a couple years ago. I was feeling guilty for my sporadic posting
 since school got out, and finally got tired of looking at it on our dining room table!
I decided to knock it out over the weekend seeing that we're
 heading out for vacation tomorrow and I'll be taking the rest of the week off. :)
   

 I decided on a classic Greek Key pattern, mixed with the cheetah patterned stencil
 I did on the walls last year gave me the eclectic vibe I love.    


I taped off the border squares and made a super easy stencil for the Greek Key 
pattern inside the squares. 


Supplies:
Ikea Osted Sisal Rug (2' 7" x 4' 7") - $24.99
Black Latex Paint (Satin finish)
Painter's Tape
Stencil Brush 

I didn't unroll the rug for long, but it would help to unroll and let it flatten before 
starting, although I don't think it affected the outcome if you're excited to start.  

It would be a LOT easier to create a stencil that includes the square border 
instead of going to the trouble of taping them off.  
 I'll show you how I did it in case you have nothing better to do on your weekend!

1) Tape rug to create 8 individual squares. I use the width of the tape as a guide for
my measurement (see the small pieces). 


2) Trim tape to create the square border to stencil.


3) I stenciled one coat on all eight squares, then went back over with a second coat.  


4) I used painter's tape to create the Greek Key pattern/size I preferred on top of
a cutting mat. Then placed plastic on top of my pattern and cut out using a sharp 
craft knife.


5) Center your stencil on the square and stencil using a straight up and down pouncing
motion to keep paint from seeping under the edge of the stencil. 

You can see how easy it would be to have created the square border as part of the stencil.


I wanted my spacing in the center between the two Greek Keys wider and used a piece
 of tape over the stencil. That was all I used to keep the stencil secure on the rug as I
 was stenciling. I didn't remove it until from the plastic until the entire rug was finished.


That's it, once you have the stencil cut out it goes quickly. 


 I'll be back in the swing next week!
We're headed to Lake Tahoe, I'll be sharing some of our adventures on Instagram
if you'd like to follow along during the week.


Thursday, April 16, 2015

ikea hemnes cabinet


Happy Friday, friends!!
Ok, so I didn't think you all would read this if I titled it
IKEA Hemnes Shoe Cabinet, 
BUT every time I'm in the store I stop by and check them out because they're the
 ultimate in streamlined storage that doesn't look like storage.
 The minimal 8.5" - 11.75" depth is ideal for a small entry, hallway, back entrance,
staircase landing, mudroom or office.  
The units only have front legs to allow for the closest fit to the wall.    
Available in two sizes. 

Ikea Hemnes Shoe Cabinet

$99
Black or White 
40" H x 42"W x 8.5" D  - HERE

$129
Black or White
50" H x 35"W x 11.75" D - HERE

Check out these with great custom looks by easily changing out the hardware...

startwithfourwalls.com
lezoemusings.com
 windgatelane.com
 lindevegen.no
 idosm.com
 lemonademakinmama.com
ikea.com
integrationsblog.wordpress.com
 alvhemmakleri.se
 ikea.com

Are you following along with the One Room Challenge you may have seen
Jen's @ I Heart Organizing - she just painted it and added pretty hardware.

 iheartorganizing.com

If you're an Ikea fan you can find more of my favorites here,
and if not, you might become one when you see these awesome items:

Vittsjo Shelving Unit
Strandmon Chair
Brimnes Bed
Black & White Eivor Throw
Henriksdal Chair
Salong White Vase

Sunday, March 2, 2014

diy tanzania wallpaper knock-off...


Before I get to the tutorial, thank you all SO much for your sweet comments on my
  Foyer Reveal last week! If you missed it go here for the pretty pictures! :)
It makes sharing my DIY adventures all the more fun to have you along!

Do you remember the popular BAM or SLAM series? Elizabeth @ The Mustard Ceiling
would pose a design question and everyone would weigh in with their opinion. Imagine my
surprise while researching for this post - I happened to come across my comment in 
October of 2012 on Thibaut's Tanzania wallpaper! 

As much as I LOVE it, I’d prefer it in a smaller, less permanent dose…SLAM.
Pam @ Simple Details recently posted..interest for your entryMy Profile

And, another coincidence was the post I wrote the day before:
'Interest for your Entry'
It wasn't about the Cheetah Spots Stencil that now gives mine plenty of interest, but
 another one of my favorite things to include in an entry! :) Check it out here
Clearly our entry had been haunting me on my mind for some time! 


So, here's the scoop - I used Cheetah Spots Stencil from Royal Design Studios. But, I
gave it a couple slight tweaks to get the look of the fabulous, high-end Tanzania wallpaper.

This is what the original stencil looks like, Kristin from The Hunted Interior  stenciled
 fabric to create spotted drapery panels here. 

Kristin @ The Hunted Interior

This is the original Thibaut Tanzania Wallpaper, the pattern isn't quite as open
and the spots are more irregular shaped.


The first tweak...
Scotch Blue Painter's Tape - torn and randomly placed over some of the rounded edges
 to give them the irregular look. The tape stayed put for my entire stencil job. 


I did a sample to illustrate the simple process and differences for you.
I used Royal Design Studios Flat Black Stencil Creme and their Stencil Brush.

                               Tweaked Pattern                                           Original Pattern


Second tweak...
After my entire foyer was stenciled I went back and filled in the open spaces to add more
pattern, being sure to cover the area all the way to the ceiling and into corners. I chose
 random areas and stenciled one spot at a time. Imprecise is perfect, just eye-ball the area
 and choose a pattern from the stencil that fits. That's it! If you end up with a spot you think is 
horribly wrong, don't fret you can paint over it!! It sounds time consuming but actually goes
 quickly. I'm not patient enough to wait for paint to dry, so smudges are inevitable. When
 you're all finished go back with the wall paint and do a quick clean up.

Final Tweaked Pattern                                           Original Pattern


I love the pizazz and look of high-end Tanzania wallpaper it gives my foyer 
at a fraction of the cost!


Royal Design Studios provided the stenciling products for my project,
they were a pleasure to work with and I highly recommend using their company!
Thank you!

Thursday, February 27, 2014

foyer reveal...unexpected pizazz

Our little foyer was a booooring first impression, and so overdue for some attention.
It's 4 1/2 feet x 4 1/2 feet, barely big enough to turn around and if that isn't bad
enough it has two doors and two doorways, 1938 charm at its best! Since there wasn't
any possibility for even a teeny piece of furniture or art, I had the small wall area and
 ceiling to make a statement, and decided to be daring. Two knock off diy projects gave me
the look I was going for and a lot of bang for the buck! 


I've always loved Thibaut Tanzania wallpaper, but it's $$ pricey and I'd seen a similar
stencil at Royal Design Studio I thought could work with a little tweak. I'm all about
 getting a high-end look for less and not having to remove wallpaper if I can avoid it!
Cheetah Spots Wall Stencil was perfect for creating the look I hoped!

BEFORE - BOOORING!!


  It was ugly! Yes, I let Detail Boy keep his chin-up bar there (he convinced me if it was right
 there he would use it all the time, and he does, so...) then the lovely boob light, and the
 inside of the closet hadn't been painted since I used it to practice sponge painting years ago. 

Moving on...


My love for stripes lives on...in the coat closet, in black, cream and white.


The DIY Sunburst Flush Mount Light is super easy and inexpensive.
(Btw, thanks everyone for all your kind comments!)
I'm hoping people look up! :)


My inspiration was this $700
 Arcadian Home - Global Views Sunburst Gold Modern Flush Mount Ceiling Light


I used Martha Stewart's Sunburst Mirror to create this version!
DIY Sunburst Flush Mount Tutorial


 My favorite part is that our new entry is so unexpected and bit sassy. 


Be sure to check back on Monday, I'll fill you in on the simple way I tweaked
the stencil to give it a more custom look, my stencil trick and paint colors. 

A huge thank you to Royal Design Studios for providing the stencil and supplies,
you couldn't have been more pleasant and helpful! 


I'm playing along with all the creative bloggers at East Coast Creative
Creating with the Stars 2014 - #CWTS 2014
Don't miss out, follow along with the fun and exciting contestants!

Joining Sarah @ Thrifty Decor Chick for March Before & After
Liz Marie, Jennifer, Tonya & Mandy @ Inspire Me Please Link Party

Related Posts Plugin for WordPress, Blogger...
 
Pin It button on image hover