Tuesday, January 31, 2012

anthro-a-pologie...

Anthro-a-pologie

define: an.thro.a.pol.o.gie

  An acknowlegement expressing regret that Anthropologie's prices and my budget
 aren't compatible, therefore, forcing me to 'knock-off' their beautiful pillow.   

My next diy...

Anthropologie's Dianthus Tile Pillow  $168
(if your budget is a fit you can find it here)

Here are the goods for my version of the pillow....


...and I'll be adding a few other surprise pops of pink to my neutral decor!

Stop by on Friday to see the details of a transformed IKEA piece that will be included!

Thank you sweet friends for reading and inspiring me!
I LOVE blogging and sharing my projects with you!


Monday, January 30, 2012

valentine ideas...

~  Beautifully Simple & Inexpensive Valentine Ideas  ~


eighteen25blogspot.com

This idea is as easy as baking a batch of your favorite cookies,
it's all in the presentation! 
Print your own free tags click here


Brandi is the sweet blogger behind the blog
Her clever idea couldn't be easier - go here to get the scoop on recycled vases!

FortuneCookieFreebie1
celesterockwood-jones.typepad.com

Who can resist breaking open a fortune cookie
to find what the future holds?  
freebie fortune is sure to be a hit!

bakerella.com

A simple cupcake taken up a notch!
Go here for the sweet details!


My favorite, a little salty with my sweet, yum!
No baking!
  Go here for the easiest treat ever.

~  Presentation, Presentation, Presentation  ~


Tomorrow...my next diy...a simple Anthropology knock off!


Sunday, January 29, 2012

diy fish scale lamp shade

I'd seen fish scale art, here and there,
and then I saw this drum shade, made by Emily at Newlywife.
 I wanted one!

My version....


I followed Emily's tutorial, here are my usual diy details:
Product, Price, Prep, Procedure, Problems and Patience!

Product & Price

Brown Vinyl - 1 Yard - $14.00
(3/4 yard would have been plenty, my shade is 9 x 14)


Metallic Craft Paint
Classic Gold, Classic Champagne - $2.00


Procedure

Trace your circles and cut out.
 (mine were 2 1/2", I used 150) 


I painted 8 circles at a time, first covering them with a small amount gold and
then a smaller amount of champagne on top.
 Play with the color a bit until you get the look you like.


The mottled appearance is created by folding the circle in half and in half again,
 while the paint is wet.
 Working quickly, fold the circle, hold it for a few seconds, then open and set aside to dry.

Sorry, forgot I was a blogger for a few minutes and didn't take photos of attaching them!

Fortunately, Emily is a good blogger! Here she shows you how to do it!


Problems

Did any of you notice my big mistake?
#1 - After attaching my first row of circles, I carefully lined the next row up right above
 the first row...ugh!  I should have staggered the next row!

#2 - Also, I wish mine was a little lighter and more gold, it definitely changes color and
 looks lighter when the natural light is coming in, as you can see in the photo.
(I may lightly brush some a little more color onto it.) 

Patience

2 hours drawing and cutting 150 circles
(subtract 10 minute break for a Thin Mint cookie and blog reading)
1 /1/2 hours painting and folding 150 circles
1 hour attaching circles to shade


Thank you for the inspiration, Emily,
you did a wonderful job!

&

More inspiration, if you're feeling inclined...


You could even give your shoes a little pizazz!

Bo'em Flat Sandals - Photo


I'm ready to scale (ha!) back and do a quick spray paint project! :)

 Joining Beth's party here
Home Stories A2Z for Tips and Tutorials


Friday, January 27, 2012

what motivates you?

Having house guests, inviting the neighborhood for a bbq, hosting holiday dinners,
 your turn for the gourmet group, your annual Christmas party?
yes, yes, yes, yes, and yes
Telling your blog readers you're going to complete a project - YES!

Lisa @ Shine Your Light is one of the sweetest in the blogosphere,
and she has a St. Bernard (near and dear to my heart as I grew up with them).
Her announcement of her First Before & After Party was my motivation
to get moving on my dining room.
First Friday in January we posted what we would complete by the last Friday in January.
Come over and see the before & after projects, I've had some peeks and you're in for a treat! 

BEFORE
Although I didn't get to all of my goals I shared here, I was happy to have this complete. 


AFTER
New paint and nailhead ceiling you can read the details here and here.


I think I should link it up again next month to keep the motivation going! :)


Thursday, January 26, 2012

focus!!!

In yesterday's post I said I was going to concentrate on the dining room
before starting another project.  That lasted about 12 hours! Seriously???
I was reading this great roundup of DIY lighting projects from Darlene at Fieldstone Hill,
this morning and saw this...


Isn't it gorgeous?!  What do you think it's made of?
 It was created by Emily from the blog Newlywife, she and her cousin, both newlyweds,
share their projects, recipes and ideas. Amazing job!

I had this lamp just sitting in my basement waiting for some inspiration to strike!
I spared you the scary scene and brought it upstairs!


A Goodwill find for $35, not my typical score, but it was brand new, without a scratch.
I asked the clerk about it and she said sometimes they get items directly from Target, huh?
No details from her, but sure enough...here it is for $69.

This is what I've done so far...

Testing..1..2..3


First light coat (the trick to spray paint..light coats).
Check back on Monday for the reveal and the material it's made of.
And then I'll be back to focusing on the dining room!


Have a wonderful weekend friends,
 hope you'll be focusing on FUN!

In all of my excitement over starting the new project...
 I totally spaced I was supposed to share a completed project
at Lisa's Before and After Party, so you'll be getting another post from me today, too!


Wednesday, January 25, 2012

artwork for the dining room...

Since I'm on a roll with the dining room I think I'll keep moving full steam ahead.
Otherwise, I'll get distracted and start another project before finishing this one!

Here's what I'm thinking for the walls on each side of the French doors.
(on left side of photo)
I love the look of art hung from floor to ceiling...

 
elementsofstyleblog.com

but then symmetry of this speaks to me, too...
decorpad.com 
 
 
or, an abstract paired with my traditional pieces...
                            
 decorpad.com

 or,  a statement these oversized botanicals would make...


loftandcottageblogspot.com

maybe symmetry and botanicals...
dining rooms - black green white brown farmhouse dining table upholstered wood dining chairs botanical photo gallery slate floors dining room

or maybe symmetry and gold frames...I think I'm going in circles!


Pinned Image

I think I'll sleep on it, but right now the abstract mixed
 with a couple in the first photo is my vote!

What do you think?

Tuesday, January 24, 2012

it was love at first sight!

I thought it would be fun to do a weekly series sharing the transformation of our home.
We've lived here for 15 years, and completed a remodel 5 years ago,
while living in our delightful 1938 basement for 6 months...can you say f-u-n!!

 So, without further ado...
Chapter 1

Here is the gem I found, if only I had a picture of mr. simple's expression
when we drove up and I said, "I LOVE it!"
 I'm sure he was having second thoughts about his wife of three months.
I don't think I've ever mentioned it, but handy, diy and power tools aren't in his DNA!    


As they say, "Beauty is in the eye of the beholder."


View looking from the front porch out to the street.
Have you ever seen such a beautiful mess of jungle, weeds and trees?
All I saw was that gorgeous flagstone walkway and those massive landscape rocks!
(you saw them, right?)

A few months later...


A year and a half later...


Two years later...view from front porch out to the street.
mr. simple gets credit for the lawn and garden! 


Today...


So, would you have run in opposite direction bought a beautiful new home
or
paid more than asking price to insure you had a project for years to come?


Monday, January 23, 2012

nailhead ceiling...how to

Thank you all so much for your kind comments on the
transformation of my dining room ceiling.

Here are the details on how it all went down...
  

 Product:

Nailhead Strips - 40"  - I used 44
Nailhead Tacks - each 40" strip uses 16 tacks - 704 each!

 My tray ceiling is roughly 8' x 9' and I used a 22" x 21" octagon.
When estimating how much you'll need, there is no waste.

I purchased my material locally from:
Denver Fabrics
303.730.2777
(they do not have a website and are NOT the same as denverfabrics.com)
You can contact them to order materials.


Price:

Nailhead Strips  -  $1 each  x 44  =  $44.00
Nailhead Tacks  -  .03 each  x 704 = $21.12

Total:  $65.12

Procedure:

As I mentioned, I was inspired by Kara Paslay's bold pattern
and followed her tutorial by making an octagon pattern and transferring it to the ceiling.

IMG_5301  
Kara's pattern on her wall.

Using a pencil I lightly traced around my pattern on the ceiling.


I chose to center my pattern around the chandelier.
However, the chandelier isn't centered in the tray ceiling,
 because of the placement of the windows and french doors it is aligned with them
 resulting in my pattern being off a few inches.
 I chose it have it off at one side rather than the pattern not being centered
 around the chandelier....clear as mud?

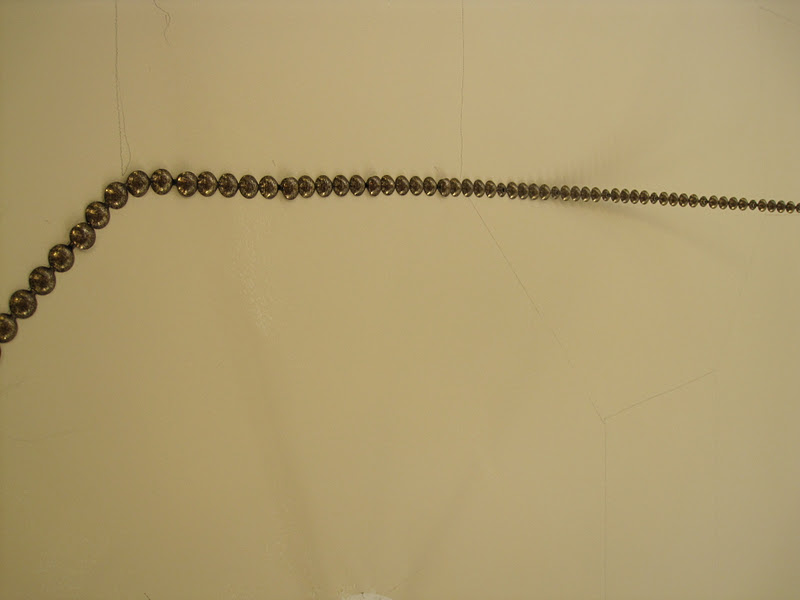
Follow your pattern and start nailing....a tack is placed at very fifth nailhead.
I was able to push the tacks directly into the drywall in some areas.


Keep nailing...the strips easily break apart when you get to the end of a line.
I measured mine by putting the strip up to the pattern and breaking off the amount needed.


Problems:

Sometimes your nails don't line up exactly as you hoped,
this is what I was aiming for.


 But, sometimes this is how it aligned.


I removed the tacks and shifted the line over just a tad.


After I thought it was finished I decided it would look better with a border...ugh!
It would have been easier if I'd added the border before nailing all the way to the edge.
Oh no, I didn't remove them, just went around them!

After adding the border, I touched up the visible pencil lines and smudges with paint.


My number one tip...Patience!
Have fun, you can do it, too!


Related Posts Plugin for WordPress, Blogger...
 
Pin It button on image hover