Showing posts with label tutorials. Show all posts

Sunday, July 19, 2015

Anthropologie Knock Off - DIY Weathered Gray Dresser


Hi friends, hope you all had a fabulous weekend. We had a busy one that included a
fun charity event, a fundraiser for the Golden Retriever Rescue of the Rocky Mountains,
GRRR Gala. Is that the best name or what? We were greeted by golden retrievers on the
 way in and they strolled about throughout the evening - completely spoiled with endless
 ear scratches and tummy rubs by all of us dog lovers. :)
Since I didn't have time to work on any of my projects I'm finally sharing the long overdue
 tutorial for the Anthropologie Knock Off Dresser from the
 One Room Challenge Bedroom Reveal.


BEFORE:
My client's dad had made them this dresser years ago but they'd never finished
it, we saw the Anthropologie Portside Dresser and set out to create a similar look.


OUR INSPIRATION:

Anthropologie Portside Dresser


HARDWARE:
Anthropologie sells the Equestrian Pulls separately
and we used Flat Corner Braces in Brass Satin from Home Depot.


We loved the rustic texture on the inspiration dresser but wanted a more subtle version,
 as well as a more overall gray color than brown.


This type of furniture makeover was a first for me. I'll tell you what I did, but different
woods and finishes will take the paint differently (i.e. my sample board vs the dresser).
I did know when creating this kind of look it's all about lots of layering the paint, 
you may start to think you've created a mess on your client's treasured piece BUT
remember it gets better as you go along. Patience!   

SUPPLIES:
Annie Sloan Chalk Paints - French Linen & Graphite
Homax Wall Texture Spray - Orange Peel 
Brown Paint (not pictured) 
Sea Sponge 
Martha Stewart Liquid Gilding in Gold - for bottom of legs
  

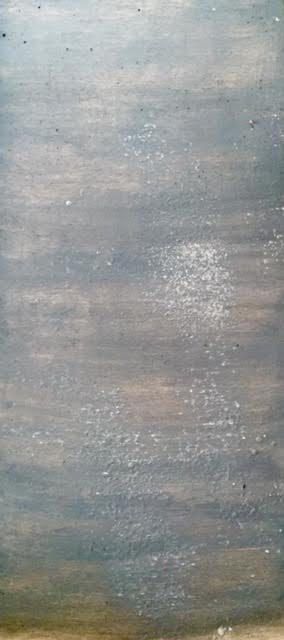
I tried a sample board first using spray on wall texture to achieve the rustic texture.
I played with the amount I sprayed on and also wiping it off as it dried (within minutes)
 to get a feel for the look we liked.    
It rubs/sands off easily, so if you get too much on your final product no worries.


I decided to do a base coat of a combination of Annie Sloan Chalk Paint
French Linen & Graphite and then apply the texture followed by more paint.
 I dipped a slightly damp sea sponge into both colors and then blotted it
off on a the paper plate.


To 'paint' the dresser I wiped the sponge across the drawers using long strokes to
alleviate any stop/start marks. The paint dries fast so be prepared to work quickly.
It's water based, so if you mess up just add some water to a clean sponge and wash it
 off, or you can always give it a light sanding.


(Hi cute little photobomber)

 After the base coat dried I randomly sprayed the wall texture over the dresser.


Then lightly rub it off to create the splotches of texture.
At this point you can tweak it to get your desired color, I added a few strokes of
brown paint (not chalk paint, just some craft paint I had) in the same method with the
sea sponge.


And continued to tweak it with a little green that I noticed in our inspiration
piece and then soften it with the lighter chalk paint watered down.
I'm sorry I can't be more specific here, it was just a lot of trial and error standing back
looking at it adding paint here and there until we came up with the color we liked.
We didn't end up sealing it with any finish or wax yet, but may still do that at some
point if we feel like it's necessary.


Despite not knowing what I was doing it was a fun project and we ended up
 loving the end result. Thank goodness!

If you'd like you can see how it looks with the rest of the their bedroom makeover:
 Another Craigslist Bedroom Reveal


Sunday, March 2, 2014

diy tanzania wallpaper knock-off...


Before I get to the tutorial, thank you all SO much for your sweet comments on my
  Foyer Reveal last week! If you missed it go here for the pretty pictures! :)
It makes sharing my DIY adventures all the more fun to have you along!

Do you remember the popular BAM or SLAM series? Elizabeth @ The Mustard Ceiling
would pose a design question and everyone would weigh in with their opinion. Imagine my
surprise while researching for this post - I happened to come across my comment in 
October of 2012 on Thibaut's Tanzania wallpaper! 

As much as I LOVE it, I’d prefer it in a smaller, less permanent dose…SLAM.
Pam @ Simple Details recently posted..interest for your entryMy Profile

And, another coincidence was the post I wrote the day before:
'Interest for your Entry'
It wasn't about the Cheetah Spots Stencil that now gives mine plenty of interest, but
 another one of my favorite things to include in an entry! :) Check it out here
Clearly our entry had been haunting me on my mind for some time! 


So, here's the scoop - I used Cheetah Spots Stencil from Royal Design Studios. But, I
gave it a couple slight tweaks to get the look of the fabulous, high-end Tanzania wallpaper.

This is what the original stencil looks like, Kristin from The Hunted Interior  stenciled
 fabric to create spotted drapery panels here. 

Kristin @ The Hunted Interior

This is the original Thibaut Tanzania Wallpaper, the pattern isn't quite as open
and the spots are more irregular shaped.


The first tweak...
Scotch Blue Painter's Tape - torn and randomly placed over some of the rounded edges
 to give them the irregular look. The tape stayed put for my entire stencil job. 


I did a sample to illustrate the simple process and differences for you.
I used Royal Design Studios Flat Black Stencil Creme and their Stencil Brush.

                               Tweaked Pattern                                           Original Pattern


Second tweak...
After my entire foyer was stenciled I went back and filled in the open spaces to add more
pattern, being sure to cover the area all the way to the ceiling and into corners. I chose
 random areas and stenciled one spot at a time. Imprecise is perfect, just eye-ball the area
 and choose a pattern from the stencil that fits. That's it! If you end up with a spot you think is 
horribly wrong, don't fret you can paint over it!! It sounds time consuming but actually goes
 quickly. I'm not patient enough to wait for paint to dry, so smudges are inevitable. When
 you're all finished go back with the wall paint and do a quick clean up.

Final Tweaked Pattern                                           Original Pattern


I love the pizazz and look of high-end Tanzania wallpaper it gives my foyer 
at a fraction of the cost!


Royal Design Studios provided the stenciling products for my project,
they were a pleasure to work with and I highly recommend using their company!
Thank you!

Wednesday, October 30, 2013

ikea hack...faux ostrich covered rast

You all know I love Ikea and diy, so this was inevitable... :)
You're going to love how super easy (PROMISE!) this Rast hack is.
If you've been following along with the One Room Challenge, the brainchild of
Linda @ Calling it Home, you know I'll be using two of these Ikea Rast chests as
nightstands in the makeover of my bedroom. If you'd like to see the progress before the
 big reveal next week you can check it out Week 1, Week 2, Week 3, Week 4, Week 5.
and the Bedroom Reveal 
Btw, the bedroom has a totally different vibe, I just styled up a little corner for you.  


My inspiration was this amazing piece owned by designer Ryan Korban.


Here's how it went down:

The popular Ikea Rast 3 drawer chest for $34.99,
1 yard Vinyl Ostrich (Color - Ice) from Fabric Empire $19.99  
3 Brass Pulls from Re-Store $1.50 each 


Measure and drill for your hardware. 
Cut 3 pieces of fabric the exact size of the drawer fronts.


I used Spray Adhesive to adhere the vinyl per manufacturer's instructions. I'd highly suggest
 doing it outside, it's strong! I found it easiest to roll the piece up and begin at one end.


Press down and smooth out as you unroll the vinyl. This is quick and easy, and forgiving
if you need to lift it up and re-work it. When I finished it had stretched about a 1/4 of an inch
 beyond the edge of the drawer, I placed the drawer on a cutting mat and removed the extra
 using an X-acto knife.


When I got to this point and put my drawers in you could clearly see the edges of the pine
 showing between the drawers. I carefully peeled back a bit of the vinyl and went back
 and painted the edge of the drawers the same color as the vinyl then re-secured the edges of
the vinyl with my hot glue gun. 

DON"T DO WHAT I DID!!!
*** You should paint the edge BEFORE spraying the adhesive and attaching the vinyl*** 

I taped off the edges and used Martha Stewart's Liquid Gilding in Brass ($3.50 with coupon at Michaels, 1 container will cover 2 chests) on all the edges and the base at the bottom in front.
 Since you'll be covering the top you only need to apply it about an inch around the edge. 


While the liquid gilding is drying I attached the hardware. I used an oversize needle as a guide
and pushed it through the drilled hole from the back to the front of the drawer. Using an X-acto
 knife I cut a small circle from the vinyl for the screw to go through.

I had a piece of glass cut for the top 23" x 11 1/2" ($15) and used the glass as a template for
the piece of vinyl for the top. I didn't secure the vinyl, just placed it under the glass. 


I added 1 1/4" casters to the bottom, it took about 10 minutes! The pine is soft and I was
 able to screw them on without drilling. The wood at the base of the chest is about 1/2" wide
 and the base of caster about an inch, I only secured one side, it's not visible and very sturdy.
The casters were $7 for four, and already gold.   


The total cost per chest is $75.00.

You could easily use any thrifted piece of furniture to keep the cost down,
I chose the Ikea Rast because I wanted a narrow piece and it is 11 1/2".


If you'd like to check out another REALLY SUPER EASY hack I did: 

If you're not familiar with the One Room Challenge stop by the links above,
where you can find 20 bloggers making over their rooms in 6 weeks!
Crazy talent, you're in for a treat!
My final Bedroom Reveal here


Thursday, September 12, 2013

diy awning tutorial...

Thanks for all the awning love everyone! :)
If you're not into DIY details, and just want pretty pictures check out the awning reveal.
It's rained for three days and it's working just like an awning should!
 I always hold my breath with diy projects like that, never knowing for certain how
they'll perform in the end. This is totally off subject, but that reminded me...remember last
 March when I painted my bathroom fixtures and shower surround - they are still holding
 up perfectly after six months. I'll let you know on the awning.


Step 1 - Frame
Find a student enrolled in a welding course to construct a frame for you, if they happen
 to be your awesome neighbor that's best! They're easy to find, check out this article from
 The Denver Post, 'Welding is the new hot course on campus.'  
I played around with cardboard and duct tape to construct a mock up to determine
 the right size. You'll want to consider the width, drop and projection.
Mine measured 64" W x 13" D x 18" P
Our trim above the door dictated our measurements, if given a choice I would
have chosen a longer drop. My 'awning prototype' post shows several examples of
different styles.


 We purchased Weldable Square Steel Tubing from Lowes here.
I went on vacation and left the rest to the pro and he constructed it to the specifications of the
 mock up and also painted it for me, a great idea, it's dirty, and you'll be handling it a lot.
Our size required 4 - 6' pieces @  $22 ea. = $88

Step 2 - Fabric Cover
I purchased 2 yards of a classic black and white stripe outdoor fabric.
Use the frame to make a pattern for the end pieces, add 1/2" seam allowance to all the edges
before cutting your fabric. Line your pattern up with the edge of the stripes, your seam
 allowance should extend past the edge of the stripe. Measure for the additional length of your
 awning that will fall below the frame. I chose 8", but it will vary depending on the size and
 scale you like. Cut two, one for each end. 


I'm sorry I didn't take a picture of measuring for the main piece of fabric, but it's super easy, 
 the width of your frame + 1" for seam allowance X the height of your frame + the 
amount of fabric you want to fall below the frame, again I chose 8" + 1" seam allowance.
Mine looked like this:
64" + 1" =  65 " Wide   X   22" + 8" + 1" = 31" Height  

Next we'll sew the end pieces onto the main piece of fabric, with right sides together
pin and sew. I didn't sew all the way down to the bottom edge, I wanted to make
sure I got a good fit with the corners first. I found it easiest to bring the frame in and 
put it on the counter, I put the cover over it and ended up  tweaking it a bit, I took it in
 about a 1/4 " at a time until I liked the fit. Then sewed down the entire length of it. 
After you have your fit finalized press all seams down on the front and back side of your 
fabric to insure professional looking seams.  


Step 3 - Mounting the Frame

 Before mounting the frame against our house I secured several pieces of 3/4" velcro along the
top edge, front edge and ends of the frame, as well as the fabric, measuring to be sure
 they match up.


We used three large bolts to secure the frame to our house, first drilling three holes into the
steel tubing frame and then aligning pilot holes on the house trim for the bolts. 


Step 4 - Tweak!
Secure the fabric to the velcro and tweak away, the velcro allows for some flexiblility as far as
adjusting, but unfortunately they'll all probably be a bit different at this point. I opted for a
looser more relaxed look in the end leaving a little slack in mine. It helped with the buckling
 you see at the corners. 


Hope you're inspired to find a teenager with some welding skills and give it a try!
Thanks, J ~ I couldn't have done it without you!  


Related Posts Plugin for WordPress, Blogger...
 
Pin It button on image hover