Tuesday, July 28, 2015

Layered Strawberry Shortcake in Mason Jars


My friends delight in making jokes about my love for putting food in 
mason jars ~ seriously, is it not just more fun? They're so cute, and I think it's
such a clever idea for picnics, potlucks and BBQs to open your cooler and pull
out little individual servings!  It couldn't be easier, and my favorite words when
 I'm entertaining - they can be made ahead of time!    


12 - 8 ounce mason jars
1.5 lb. carton of strawberries, cut in pieces
 1/2 cup sugar (or less)
Sprinkle sugar over strawberries and let sit 20 minutes, or until juices form.   


Pound Cake cut in cubes
 I use 6 large butter pound cakes from Costco (12 to a pkg.)


Heavy Whipping Cream - 1 pint
3 tablespoons sugar
Whip cream until stiff gradually adding sugar while whipping.


Layer ingredients in mason jars. 
Pound Cake, Strawberries & Cream and repeat.
Place lids on jars and refrigerate.
Can be made 3 - 24 hours prior to serving.    
Yield: 12 servings

Tell me I'm not alone in my enthusiasm for mason jars. :) 


Monday, July 27, 2015

DIY Graphic Nailhead Ceiling


Hey friends, hope you spent some time over the weekend soaking up summer, as it is
 flying by! We only have three more weeks before school starts. : (
I'm on a roll, finally sharing tutorials from Another Craigslist Bedroom Makeover Reveal,
  from the One Room Challenge a couple months ago. Last week I shared the 
Anthropologie Knock Off - DIY Weathered Gray Dresser
 and today the Graphic Nailhead Ceiling. My clients' tray ceiling was the perfect backdrop
 for a statement and, of course, one of my favorite ideas was a
  Nailhead Ceiling similar to my dining room that I DIYed a few years ago,
 and they were game.  

(Btw, I love how the ceiling pattern plays off the bases of the benches.)

Since we were working with a large space with awkward angles and a ceiling fan
off center I knew a repeating pattern may end up looking off balance, and being a
 nightmare. I had hoped to come up with something random that wouldn't draw attention to
 the angles. This graphic wallpaper was the ticket!! Our goal was to create a more open
 and less busy pattern.  


PRODUCT

 French Natural Nail Head Trim - 36 yd rolls @ $33 ea. x 2.5 rolls  = $82.00
1 Box of Nails @ $20 

TOTAL $102.00

 Here is an online source, DIY Upholstery Supply, 
we purchased ours locally at Western Upholstery Supply in Denver. 

For reference our room is 21.5' x 16'

PROCEDURE

The nailheads come in a roll, every fifth nailhead is open to secure the strip with a 
nail. We found they easily pressed into the drywall ceiling in most places. They also
 easily cut apart when you reach a stopping point.  


We started by outlining the perimeter of the ceiling and then creating our random pattern
 inside the border .  


To create the pattern we began with a couple longer perpendicular strips and
intersected smaller strips from those lines.  


And just kept going.
We worked in large sections and would get down from our ladders to look at the pattern
 from different spots in the room (as you get a different perspective) to determine the 
direction of the next few strips. It was truly random, but looked best when we varied the size
 of the spaces, for example if we created a large triangle we would aim for a smaller one or 
different shape next to it, or if we ended up with a wide space, we'd try for something
 narrower next to it. 


At first we simply held the strip up to the ceiling and when we had it situated in a direction
we liked we began nailing, but some of our lines were ending up not quite as straight as 
we liked. We found by using a yardstick and lightly drawing a pencil line to use as a guide
to align the strips it solved the problem.  


It took my client and I about 7 hours and then she and her husband finished up
that evening in another couple hours. And NO, our necks didn't hurt, neither of us
were even sore the next day, except my thumb was numb for a couple days after from
pushing the nailheads into the drywall. It isn't hard, but a LOT of climbing up and 
down ladders. We also stood on a long dresser and moved it around the room as we
 progressed. I highly recommend doing it with someone fun, the time passes quickly
 and you'll get in lots of girl talk!        


If you'd like to check out a similar look and tutorial for creating a pattern my
 dining room ceiling here and here was a fun project that I did when I first started
 blogging, so please excuse the bad photos and styling...cringe! :) 


Tuesday, July 21, 2015

I heart hammocks!


Happy National Hammock Day, friends! 
One of my favorite traditions each summer is taking our hammock out of storage
and piling it with pretty pillows. If you're the can't sit still type, like me, I dare you to
 sink into hammock and not feel the 'lazy days of summer' vibe come over you. The
 squirrels ruined a few of ours, but I found one on Craigslist and we're back in business.
  I'm totally crushing on the new boho style with macrame, crochet and fringe details,
now is the perfect time to check them out with the end of summer sales upon us. :(    

Simple Details :)


Hayneedle - Several styles on Sale

No trees, no worries!


Here's to finding a few minutes in your day to to chill and soak up summer. 


Sunday, July 19, 2015

Anthropologie Knock Off - DIY Weathered Gray Dresser


Hi friends, hope you all had a fabulous weekend. We had a busy one that included a
fun charity event, a fundraiser for the Golden Retriever Rescue of the Rocky Mountains,
GRRR Gala. Is that the best name or what? We were greeted by golden retrievers on the
 way in and they strolled about throughout the evening - completely spoiled with endless
 ear scratches and tummy rubs by all of us dog lovers. :)
Since I didn't have time to work on any of my projects I'm finally sharing the long overdue
 tutorial for the Anthropologie Knock Off Dresser from the
 One Room Challenge Bedroom Reveal.


BEFORE:
My client's dad had made them this dresser years ago but they'd never finished
it, we saw the Anthropologie Portside Dresser and set out to create a similar look.


OUR INSPIRATION:

Anthropologie Portside Dresser


HARDWARE:
Anthropologie sells the Equestrian Pulls separately
and we used Flat Corner Braces in Brass Satin from Home Depot.


We loved the rustic texture on the inspiration dresser but wanted a more subtle version,
 as well as a more overall gray color than brown.


This type of furniture makeover was a first for me. I'll tell you what I did, but different
woods and finishes will take the paint differently (i.e. my sample board vs the dresser).
I did know when creating this kind of look it's all about lots of layering the paint, 
you may start to think you've created a mess on your client's treasured piece BUT
remember it gets better as you go along. Patience!   

SUPPLIES:
Annie Sloan Chalk Paints - French Linen & Graphite
Homax Wall Texture Spray - Orange Peel 
Brown Paint (not pictured) 
Sea Sponge 
Martha Stewart Liquid Gilding in Gold - for bottom of legs
  

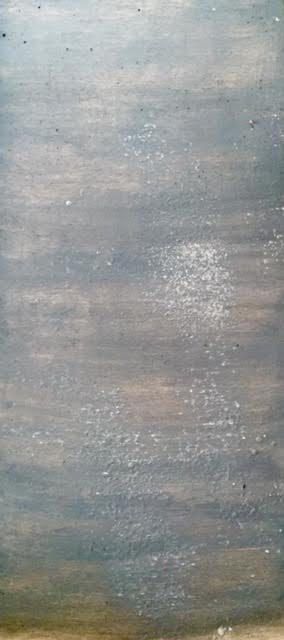
I tried a sample board first using spray on wall texture to achieve the rustic texture.
I played with the amount I sprayed on and also wiping it off as it dried (within minutes)
 to get a feel for the look we liked.    
It rubs/sands off easily, so if you get too much on your final product no worries.


I decided to do a base coat of a combination of Annie Sloan Chalk Paint
French Linen & Graphite and then apply the texture followed by more paint.
 I dipped a slightly damp sea sponge into both colors and then blotted it
off on a the paper plate.


To 'paint' the dresser I wiped the sponge across the drawers using long strokes to
alleviate any stop/start marks. The paint dries fast so be prepared to work quickly.
It's water based, so if you mess up just add some water to a clean sponge and wash it
 off, or you can always give it a light sanding.


(Hi cute little photobomber)

 After the base coat dried I randomly sprayed the wall texture over the dresser.


Then lightly rub it off to create the splotches of texture.
At this point you can tweak it to get your desired color, I added a few strokes of
brown paint (not chalk paint, just some craft paint I had) in the same method with the
sea sponge.


And continued to tweak it with a little green that I noticed in our inspiration
piece and then soften it with the lighter chalk paint watered down.
I'm sorry I can't be more specific here, it was just a lot of trial and error standing back
looking at it adding paint here and there until we came up with the color we liked.
We didn't end up sealing it with any finish or wax yet, but may still do that at some
point if we feel like it's necessary.


Despite not knowing what I was doing it was a fun project and we ended up
 loving the end result. Thank goodness!

If you'd like you can see how it looks with the rest of the their bedroom makeover:
 Another Craigslist Bedroom Reveal


Friday, July 17, 2015

what's on my secret Pinterest boards...


Every once in awhile when I'm on Pinterest I wonder what kinds of things other people
 have pinned to their Secret Pinterest Boards. In my mind it must be something very cool
 that they don't want to divulge quite yet, something innovative. 
Mine are mostly projects I'd love to make or do...someday. 
One of my favorite things about blogging is sharing ideas and inspiring
 people if I can. When I noticed my 'Secret DIY Board' had 565 Pins I thought this is
 crazy I'm never going to make all of these. It would be like having 565 pairs of shoes
 and not offering to let your friends borrow them. Well maybe not quite the same,
I'd probably rather have the shoe offer. :)  Anyway you get the idea, so here are some
fun ideas I thought you might like. 

Please pin from original source indicated below the photo. 

Hang photos or artwork from hooks.


DIY this high-end snakeskin covered parson table.


Slip a macrame piece over a jug for unique texture, keep an open mind at
 thrift stores for a similar textile.


  Clearly, I had a crush on marbling and big DIY plans.


DIY a thrifted console by adding perforated metal.
I love the interest and texture vs a typical console.

Can't get enough of tassels, fringe, trim and texture!


One of my favorite surprises to send, it's as much fun putting together
a custom Box of Sunshine as it is to receive! 
Some items I like to include - yellow nail polish, yellow note cards, 
yellow bath pouf, yellow dish towel, smiley face sticky notes, lemon hand soap,
lemon dish soap, yellow spatula, yellow pot holder, yellow silly string, 
yellow bath foam for kiddos ... :) 


Paint your ordinary fan to give it a retro look.


Use an ornate console outside, a marble/granite remnant top would make a 
perfect buffet for entertaining. 


Jill Sorenson - sorry broken link

So, what's on your Secret Pinterest Board? 
You can check out all my Pinterest Boards or follow them here.

Have a wonderful weekend friends!


Related Posts Plugin for WordPress, Blogger...
 
Pin It button on image hover